
728x90
CDS와 SAPUI5를 이용한 파일 업로드(1)
App.view.xml
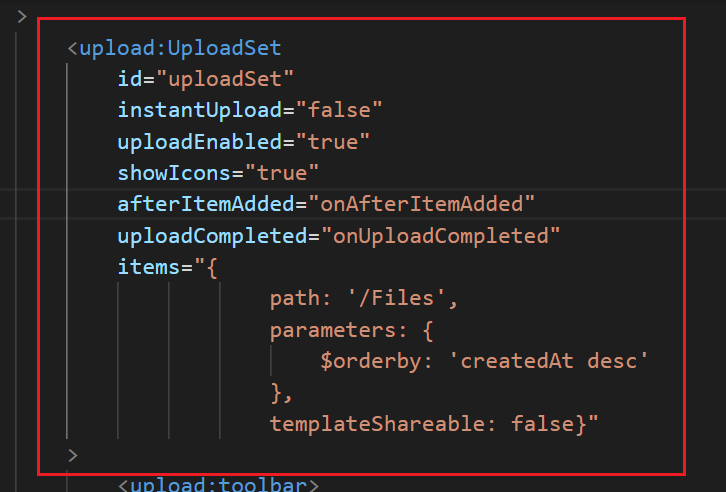
<upload:UploadSet
        id="uploadSet"
        instantUpload="false"
        uploadEnabled="true"
        showIcons="true"
        afterItemAdded="onAfterItemAdded"
        uploadCompleted="onUploadCompleted"
        items="{
                    path: '/Files',
                    parameters: {
                        $orderby: 'createdAt desc'
                    },
                    templateShareable: false}"
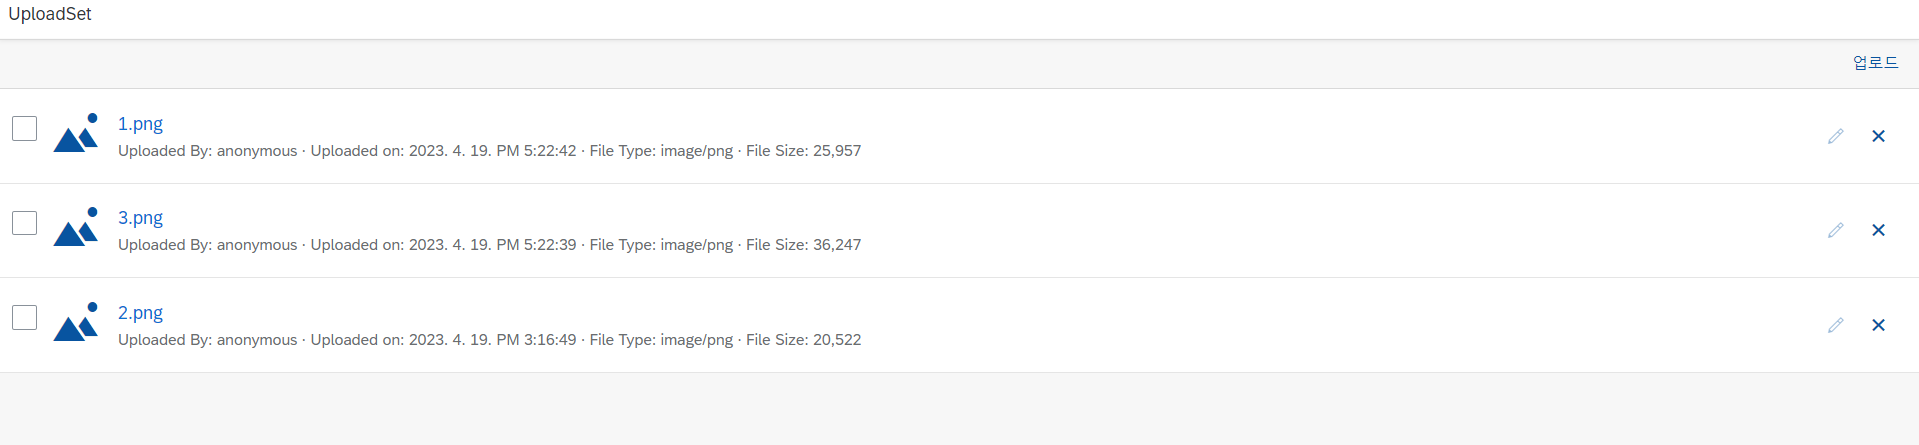
| 이벤트 | 키 | 설명 |
| id | uploadset | Controller의 byId()와 연결되어 이벤트가 실행될 수 있도록 한다. |
| instantUpload | false | 파일이 추가되는 즉시 업로드 프로세스를 작동시킬 지를 정의한다. false : 파일 추가 시, 업로드가 바로 작동되지 않는다. |
| uploadEnabled | true | 업로드 액션 작동을 허용한다. |
| showIcons | true | 파일에 관한 아이콘을 보여준다. |
| afterItemAdded | onAfterItemAdded | items에 업로드 되는 새로운 파일이 추가 되었을 때, Controller에 있는 해당 이벤트가 실행된다. |
| uploadCompleted | onUploadCompleted | 업로드가 완료되었을 때 Controller에 있는 해당 이벤트가 실행된다. |
| items | path | 업로드 파일은 attachments/Files 경로에 라우팅 되어 데이터가 저장되도록 한다. |
| parameters | $oderby를 createdAt(업로드 일시)을 기준으로 desc(내림차순) 정렬한다. |
|
| templateShareable |
App.Controller.js
onAfterItemAdded

onAfterItemAdded: function (oEvent) {
    var item = oEvent.getParameter("item")
    this._createEntity(item)
    .then((id) => {
        this._uploadContent(item, id);
    })
    .catch((err) => {
        console.log(err);
    })
}
onAfterItemAdded 메서드는
파일 업로드 UI 컨트롤에서 새로운 파일 요소가 추가될 때 호출되는 이벤트 핸들러이다.
_createEntity 메서드를 호출해 새로운 entity를 생성하고, 해당 entity ID를 가져온다.
그리고 _uploadContent 메서드를 호출하여 파일을 업로드 한다.
이 메서드에서는 Promise 객체를 사용해 비동기적으로 작업을 수행하게 된다.
즉 새로운 entity 생성 및 파일 업로드가 성공하면 _uploadContent 메서드가 호출되고,
실패하면 catch 블록이 호출된다.
onUplodCompleted

onUploadCompleted: function (oEvent) {
    var oUploadSet = this.byId("uploadSet");
    oUploadSet.removeAllIncompleteItems();
    oUploadSet.getBinding("items").refresh();
}
onUploadCompleted는 파일 업로드가 완료될 때 호출되는 이벤트 핸들러이다.
oUploadSet 객체를 하나 만들고, view에 있는 id uploadSet과 연결시켜 준다
removeAllIuncompleteItems() 메서드로 업로드가 완료된 파일 요소를 제거한다.
getBinding() 메서드로를 사용해 UI 컨트롤에 바인딩된 데이터를 가져오고,
refresh() 메서드를 통해 파일이 업로드된 UI로 다시 보여주도록 한다.
onRemovePressed

onRemovePressed: function (oEvent) {
    oEvent.preventDefault();
    oEvent.getParameter("item").getBindingContext().delete();
    MessageToast.show("Selected file has been deleted");
}
onRemovePressed는 업로드되어 있는 파일을 삭제하는 과정을 나타내는 이벤트 핸들러이다.
사용자가 파일을 선택하고 삭제 버튼을 누르면 oEvent 객체를 통해 선택한 파일요소가 전달된다.
getBindingContext() 메서드를 사용해 선택한 파일 요소의 바인딩 컨텍스트를 가져오고,
delete() 메서드를 호출해 바인딩 컨텍스트에 해당하는 파일 요소를 삭제한다.
MessageToast 객체를 사용해 삭제된 파일에 대한 메세지를 표시한다.
onOpenPressed

onOpenPressed: function (oEvent) {
    oEvent.preventDefault();
    var item = oEvent.getSource();
    this._fileName = item.getFileName();
    var that = this;
    this._download(item)
        .then((blob) => {
            var url = window.URL.createObjectURL(blob);
            var link = document.createElement('a');
            link.href = url;
            link.setAttribute('download', that._fileName);
            document.body.appendChild(link);
            link.click();
            document.body.removeChild(link);
        })
        .catch((err)=> {
            console.log(err);
        });
}
onOpenPressed는 업로드 된 파일의 이름을 클릭하였을 때 파일을 다운로드 할 수 있도록 하는 이벤트 리스너이다.
oEvent는 이벤트가 발생한 요소(element)와 관련된 정보를 제공하는 이벤트 객체이다.
preventDefault()를 사용함으로써 브라우저상의 기본 이벤트 기능에 대한 구현을 못하게 막는다.
즉 링크를 클릭할 때 파일 URL로 이동하는 기본 동작을 방지하는 것이다.
변수 item을 function()에 삽입해 놓은 oEvent를 기반으로 getSource() 메서드를 사용하여 데이터 자원을 저장한다.
this._fileName은 자원을 저장하는 item에 업로드하는 File 이름을 getFileName() 메서드를 통해 가져온다.
여기서 this는 전체 함수가 strict 모드로 선언되었기 때문에 전역변수가 있다고 하더라도 그것을 참조하지는 않는다.
그렇다면 this._fileName에서 this가 가리키는 것은 무엇일까?
바로 onOpenPressed 메서드 자체를 가리킨다.
즉 해당 메서드에서 인스턴스화 된 변수나 함수 등 모두를 참조할 수 있게 되는 것이다.
다음으로 this._download에서는 업로드 된 파일을 다운로드 할 때 필요한 속성들을 결정한다.
.then은 실행시키고자 하는 작업을 비동기로 처리하며,
blob(binary large object)은 바이너리 형태, 즉 이미지나 비디오 등의 멀티 미디어 객체를 나타낸다.
변수 url은 createObjectURL() 메서드를 통해 새로운 URL을 생성토록 한다.
변수 link는 document.createElement() 메서드에 HTML a 태그를 넣어 하이퍼링크가 생성되도록 한다.
link의 하이퍼링크에 대한 URL을 생성하기 위해
link.href를 위에서 인스턴스화 했던 blob 형태의 url로 초기화한다.
그리고 link의 Attribute은 download할 수 있는 기능으로 선언해주고, 링크의 이름은 파일명으로 설정한다.
document.body.appendChild() 메서드를 사용함으로써 생성된 link의 url을 HTML 자식요소로 추가한다.
link.click() 메서드로 업로드 파일 이름을 클릭하면,
document.body.removeChild() 메서드로 link의 자식요소를 삭제한다(?)
위 모든 과정에서 오류가 생겼을 시에는 err 메세지를 팝업시킨다.
_download
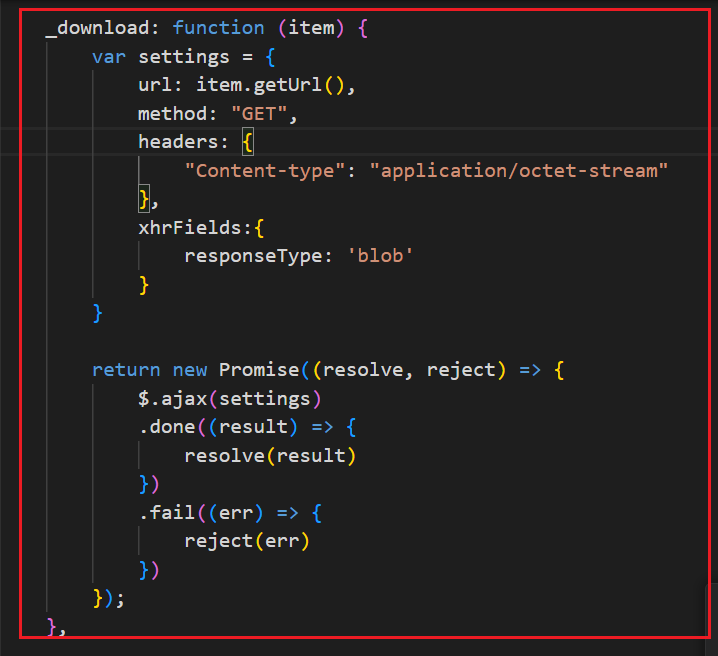
_download: function (item) {
    var settings = {
        url: item.getUrl(),
        method: "GET",
        headers: {
            "Content-type": "application/octet-stream"
        },
        xhrFields:{
            responseType: 'blob'
        }
    }

    return new Promise((resolve, reject) => {
        $.ajax(settings)
        .done((result) => {
            resolve(result)
        })
        .fail((err) => {
            reject(err)
        })
    });
}
이제 onOpenPressed 이벤트 리스너에서 사용하고자 하는 _download라는 이벤트 핸들러를 생성한다.
변수 settings에서 item이라는 매개 변수를 기반으로 getUrl() 메서드로 URL 값을 가져온다.
method는 GET 방식을 사용하고,
ajax 호출 방식은 데이터를 항상 문자로 처리하기 때문에
xhrFields로 responseType을 blob으로 명시하여야 한다.
이제 서버로부터 받아온 response 데이터가 blob 형태로 반환되고,
반환된 blob 데이터는 _downlod 메서드에서 반환된 Promise 객체를 통해
onOpenPressed에서 .then 메서드를 사용함으로써 처리가 된다.
객체 Promise를 생성하고 위에서 설정해두었던 settings 값을 ajax를 이용해 결괏값에 대해 비동기 처리한다.
즉 $.ajax를 사용해 AJAX 요청을 보내고, 응답으로 받은 데이터를 Promise 객체를 통해 반환한다.
.done에서 resolve는 result, 즉 결괏값이 성공적으로 완성되었음을 알려주며,
.fail에서 reject는 err, 즉 기능 실행에 실패했음을 알려준다.
err에 관한 메세지는 onOpenPressed에 catch로 이미 에러 메세지를 노출시키도록 해놓았다.
_createEntity

_createEntity: function (item) {
        var data = {
            mediaType: item.getMediaType(),
            fileName: item.getFileName(),
            size: item.getFileObject().size
        };

        var settings = {
            url: "/attachments/Files",
            method: "POST",
            headers: {
                "Content-type": "application/json"
            },
            data: JSON.stringify(data)
        }

    return new Promise((resolve, reject) => {
        $.ajax(settings)
            .done((results, textStatus, request) => {
                resolve(results.ID);
            })
            .fail((err) => {
                reject(err);
            })
    })
}
_createEntity에서 변수 data에 item에 저장돼 있는,
즉 data-model.cds에 있는 속성인 mediaType과 fileName, size를 가져온다.
아래 ajax 등은 _downlod에 있는 것과 마찬가지로 입력하면 된다.
_uploadContent

_uploadContent: function (item, id) {
    var url = `/attachments/Files(${id})/content`
    item.setUploadUrl(url);
    var oUploadSet = this.byId("uploadSet");
    oUploadSet.setHttpRequestMethod("PUT")
    oUploadSet.uploadItem(item);
}
_uploadContent에서는 파일에 대한 매개변수 item과 id를 받아와 업로드된 파일의 URL에 대한 리소스를 생성한다.
변수 url에는 Files 경로에 유니크하게 생성된 id 값을 추가하여 새롭게 경로를 수정해 저장한다.
setUploadUrl() 메서드에 갱신된 url 값을 설정한다.
변수 oUploadSet에는 uploadSet을 id로 가져와 저장한다.
setHttpRequestMethod() 메서드에서 PUT을 사용하여 최종적으로 UPDATE 한다.
uploadItem() 메서드는 파일 업로드가 완료되면 콜백 함수가 호출되어 처리 결과를 반환하는 역할을 한다.
'SAP > CAP' 카테고리의 다른 글
| [ CAP ] 기본 entity 변경사항이 반영된 entity 데이터 값 보여주기 (7) | 2023.04.27 |
|---|---|
| [ CAP ] CDS와 SAPUI5를 이용한 파일 업로드 - .cds / .js (0) | 2023.04.20 |
| [ CAP ] service 실행 기본 이해하기(1) (2) | 2023.04.17 |
| [ CAP ] Annotating Media Elements (6) | 2023.04.11 |


